future technology: 2016

Wednesday 22 June 2016

[Guide] Flash Rom on Lenovo A1000 using .pac file run on Spreadtrum chipset.

[Guide] Flash ROM on Lenovo A1000 using .pac file run on Spreadtrum chipset.


Flash or Install Stock Rom Lenovo A1000.  This guide only run on Lenovo A1000 which using Spreadtrum SC7730 chipset. Guidebelajar on this guide will show you how to flashing android device on Lenovo A1000 with a safe and simple stepLenovo A1000 comes with 4.0 Inches wides TFT capacitive touchscreen, Android OS, v5.0 (Lollipop), and supported with Spreadtrum SC7731 chipset, Quad-core 1.3 GHz Cortex-A7, combined with 1 GB of RAM as their engine. And be equipped with 5 MP on main camera and VGA on secondary camera, And this device released 2015, September.

Flashing in android is the same way like a fresh install on the windows PC, So by performing a flash on Android, you will give a new performance to a new phone. One reason that you should perform a flash your android is because your Android gets a boot loop or when you failed to install Stock ROM Mod.

Do you know what is bootloop, Ok? now I will explain to you what is boot loop. Some people say that bootloop is a problem that occurred on an android system which the android system could not start up going to the home screen menu. And it's happened is automatically return to the initial state for the first time when you turn on the Lenovo A1000And the device will stop to display on the smartphone logo. 

Now, follow the instructions list below, do it at your own risk.

Prepare Flash Lenovo A1000.

  1. A computer with Windows OS,
  2. Original USB Cable Lenovo A1000
  3. MTK Driver_Auto_Installer_v5.1453.03, Here   or Here 
  4. Stock Rom Here or Lollipop For Lenovo A1000. Here   
    • To ensure what is firmware used by your device now, you can check by going to Setting ->About -> Software Information ->Build Number.
    • Flashing & Servicing must be undertaken by qualified personnel only. 

    Guide To Flash Lenovo A1000 On Spreadtrum Chipset Using. Pac File.

    This is a step to flash Android Smartphone Run On Spreadtrum Chipset Using.Pac File,
    1. You need a computer with Windows OS
    2. Turn Off your android device.
    3. Download appropriate Spreadtrum USB Driver for your android devices.(If needed), here 
    4. After you finish download spreadtrum USB driver, now install it on your computer. (you can skip this step if this driver already installed)
    5. Download latest SPD Upgrade Tool sometimes this tool called with Spreadtrum Flash Tool. (Spreadtrum Upgrade tool R.2.9.2015) or you can find this tool on the package. Here
    6. When the download is done. extract this tool from a specified folder on your computer.
    7. After this tool extracted, you will able to see the picture like shown below.
      Spreadtrum upgrade tool
      Spreadtrum upgrade tool
    8. Then, Double click on upgradedownload.exe to open Spreadtrum Flash Tool.
      Spreadtrum upgrade tool
      Spreadtrum upgrade tool
    9. When this tool is launched, now connect your android smartphone to your computer.
      Spreadtrum upgrade tool
      Spreadtrum upgrade tool
    10. Once your android is successfully connected to your computer, Now click load packed button to add.Pac file (this is firmware or stock ROM that comes as .pac).
    11. Spreadtrum upgrade tool
      Spreadtrum upgrade tool
    12. When you have successfully added the .Pac file in Spreadtrum Upgrade Tool, click on the Start Downloading button to begin the flashing.
      Spreadtrum upgrade tool
      Spreadtrum upgrade tool
    13. During the flashing process, your device will restart automatically.
      Spreadtrum upgrade tool
      Spreadtrum upgrade tool
    14. Once flashing your android is completed, you will be able to see the Green Passed Message in Spreadtrum Upgrade Tool.
      Spreadtrum upgrade tool
      Spreadtrum upgrade tool
    15. Now you have successfully flashed your Android Device using Spreadtrum Upgrade Tool.
    16. To check your new firmware, you can go to settings -> About Phone ->Check Firmware
    17. Finish, now you have successfully Flash Rom on Lenovo A1000 using .pac file run on Spreadtrum chipset.

    Monday 20 June 2016

    Guide How to Root Xiaomi Redmi 2 Without PC or Computer.

    Guide How to Root Xiaomi Redmi 2 Without PC or Computer.

    Root Xiaomi Redmi 2 Without PC. This guide will show you how to Root Xiaomi Redmi 2 Without PC or Computer. Xiaomi Redmi 2 released on January 2015, this device comes with 4.7 inches IPS LCD capacitive touchscreen, 16M colors, Android OS, v4.4.4 (KitKat) and supported with Qualcomm MSM8916 Snapdragon 410, Quad-core 1.2 GHz Cortex-A53 CPU, GPU Adreno 306, 2 GB of RAM as their engine, and 8 MP on main camera and 2 MP on front camera.

    So, if you already understand what the intention of taking root on Xiaomi Redmi 2 devices, you can follow this guide below. On this guide we don't need a computer, so, you can directly root from your device.

    Guide How to Root Xiaomi Redmi 2.

    1. To start root Xiaomi Redmi 2 Without PC, you must d0wnload all file below.
    2. Now, open Updater App on tool folder.
      Root Xiaomi Redmi 2
      Root Xiaomi Redmi 2
    3. Then tap on options menu located on the top right side under battery icon.
      Root Xiaomi Redmi 2
      Root Xiaomi Redmi 2
    4. Then tap on  Select Package Update.
      Root Xiaomi Redmi 2
      Root Xiaomi Redmi 2
    5. Now select update.zip.
    6. Then your Xiaomi Redmi 2 will automatically reboot. and the installation process begins.
    7. Then back to the step 4, 
    8. Now select RootRedmi2.zip.
    9. If you use 6.4.4.0 or 6.5.2.0 or 6.6.6.0 or 6.6.8.0, 7.0.9.0 version, you can select  Yes – Root Devices (/system/xbin/su) at CWM 
    10. Use Volume Up and Volume Down to navigate the menu, and Power button to confirm.
    11. finish

    Check Root Status Xiaomi Redmi 2.

    1. Once root process complete you can check root status using root checker.
    2. Download and install root checker from Google Play Store.
    3. Now, run root checker app, 
    4. If root process successfully you will see the status on root checker that says Congratulations root access is properly installed on this device.
      root checker - xiaomi redmi 2
      root checker - xiaomi redmi 2
    5. Finish.

    [Guide] How To Install TWRP Recovery on Android Lenovo A6000.

    [Guide] How To Install TWRP Recovery on Android Lenovo A6000.

    Install TWRP Lenovo A6000. On this article, we will show you How To Install TWRP Recovery on Android Lenovo A6000. You can use TWRP for Lenovo A6000 on Lenovo A6000 + (Plus). This TWRP created by SevenMaxs. There is two version of TWRP that will be installed on your device, so you must be careful to select which TWRP that appropriate with your Android version.


    Preparation.

    1. Make sure your Lenovo A6000 already rooted. see this guide
    2. http://guidebelajar.blogspot.com/2015/05/how-to-root-and-install-cwm-lenovo-a6000.html
    3. D0wnload TWRP for Lenovo A6000 | A6000 Plus.
    4. Android OS KitKat 4.4.4 
      https://mega.nz/#!AoQyCYyY
      Android OS Lollipop 5.0.2 
      https://mega.nz/#!J8Bx1JKL
    5. If you download this file from the computer, you must Transfer the TWRP file to your device.
    6. Then, Download and install flashify from Google Play Store.
    7. Once flashify successfully installed on your Lenovo A6000 | A6000 Plus you can run this App.
    8. Then, flashify will be requesting root access, you can tap Allow
      Install TWRP Lenovo A6000
      Install TWRP Lenovo A6000
    9. Then select Recovery image.
      Install TWRP Lenovo A6000
      Install TWRP Lenovo A6000
       
    10. Then select Choose a File.
      Install TWRP Lenovo A6000
      Install TWRP Lenovo A6000
    11. Then select File Manager, and you must find the twrp file on your device.
    12. Then you will see a notification to continue flash recovery. therefore you must tap Yup
      Install TWRP Lenovo A6000
      Install TWRP Lenovo A6000
    13. Once the flashing process is finished, you will see notification flash complete, now select reboot now.
      Install TWRP Lenovo A6000
      Install TWRP Lenovo A6000
    14. Finish.

    How to Enter TWRP recovery?

    1. Turn off your Lenovo A6000 | A6000 plus device.
    2. Once it completely turns off, now press and hold Power Button + Volume Up + Volume Down at the same time.
    3. Then release all button when you see Lenovo Logo appear the on screen.
    4. Wait a while you will enter TWRP recovery.

    How to Downgrade Firmware on Lenovo A6000 PLUS | A6000 + From Android Lollipop to Kitkat [Guide].

    How to Downgrade Firmware on Lenovo A6000 PLUS | A6000 + From Android Lollipop to KitKat [Guide].

    Downgrade Lenovo A6000 PLUS | A6000 + Lollipop to KitKat. By default this device comes with with a 5,0-inch IPS capacitive touchscreen, 16M colors, works on Android OS, v4.4.4 (KitKat), upgradable to v5.0.2 (Lollipop) system and powered Quad-core 1.2 GHz Cortex-A53 CPU, Qualcomm MSM8939 Snapdragon 61Qualcomm MSM8916 Snapdragon 410 chipset and Adreno 306 GPU as their engine, and combined with 2 GB RAM, and 8 MP on main camera, and 2 MP on secondary camera.. If you've already upgrade Lenovo A6000 PLUS | A6000 + from KitKat to Lollipop version you will get new UI experience and some security patch, but on this new version, you will get low performance and stability. And now you will get your Android KitKat is back? Don't worry about this article we will show you how Downgrade Firmware on Lenovo A6000 PLUS | A6000 + From Android Lollipop to KitKat.

    We don't need PC or computer to downgrade or revert from Lollipop to KitKat, but we use stock recovery or a custom recovery like TWRP.

    Beware !!! If you install a stock recovery or a custom recovery this might brick your Lenovo A6000 PLUS | A6000 + device or your device may run abnormally

    Preparation For Downgrade.

    1. You must download Stock Rom Lenovo KitKat Version S017 from Here  <  or Here
    2. Then Backup your Lenovo A6000 PLUS | A6000 +, see this guide  
    3. Make sure you have at least 80% of battery capacity.
    4. Currently your Lenovo A6000 PLUS | A6000 + running Android Lollipop.
    5. Stock recovery must be installed on your Lenovo A6000 PLUS | A6000 + device.(recommended)

    Downgrade Process [Guide]

    1. Once Stock ROM successfully downloaded, now connect your Lenovo A6000 PLUS | A6000 + device to your computer through a USB cable and transfer Stock ROM file to SD card on the root folder.
    2. Then turn off your Lenovo A6000 PLUS | A6000 + device and boot into Recovery mode. How to do this?
      • Make sure your device is totally turn off.
      • Now, press and hold Power Button + Volume Down + Volume UP button at the same time.
      • Then, release all button when you see Lenovo Logo appear on the screen.
      • Wait a minute, and you will enter Recovery Mode.
        recovery mode lenovo A6000 Plus | A6000 +
        recovery mode Lenovo A6000 Plus | A6000 +
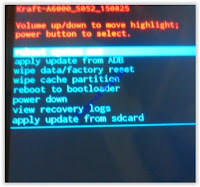
    3. Use Volume Up and Volume Down to navigate all menu. and use the Power button to confirm your selection.
    4. Now select Wipe data/factory reset 
    5. Then select Yes- Delete all user data
    6. Then select apply update from sd card.
    7. Then navigate to the Stock Rom file that has been downloaded.
    8. Now, press power button to start downgrade process.
    9. Wait a while, once this downgrade finishes your Lenovo A6000 PLUS | A6000 + will reboot automatically.
    10. Finish.

    [Guide] How to Downgrade Firmware on Lenovo A6000 From Android Lollipop to Kitkat.

    [Guide] How to Downgrade Firmware on Lenovo A6000 From Android Lollipop to KitKat.

    Downgrade Lenovo A6000 Lollipop to KitKat. By default this device comes with Android OS, v4.4.4 (KitKat) and supported with Chipset Qualcomm MSM8916 Snapdragon 410, Processors Quad-core 1.2 GHz Cortex-A53, GPU Adreno 306, 1 GB of RAM as their engine. An additional feature is the main camera with 8 MP and secondary camera 2 MP. If you've already upgrade Lenovo A6000 from KitKat to Lollipop version you will get new UI experience and some security patch, but on this new version you will get low performance and stability. And now you will get your Android KitKat is back? Don't worry about this article we will show you how Downgrade Firmware on Lenovo A6000 From Android Lollipop to KitKat.

    We don't need PC or computer to downgrade or revert from Lollipop to KitKat, but we use stock recovery or a custom recovery like TWRP.

    Beware !!! If you install a stock recovery or a custom recovery this might brick your Lenovo A6000 device or your device may run abnormally

    Preparation For Downgrade.

    1. You must download Stock Rom Lenovo KitKat Version S040 from Here   or Here  
    2. Then Backup your Lenovo A6000, see this guide 
    3. Make sure you have at least 80% of battery capacity.
    4. Currently, your Lenovo A6000 running Android Lollipop (s052, s054, or s056)
    5. Stock recovery must be installed on your Lenovo A6000 device.(recommended)

    Downgrade Process [Guide]

    1. Once Stock ROM successfully downloaded, now connect your Lenovo A6000 device to your computer through a USB cable and transfer Stock ROM file to SD card on the root folder.
    2. Then turn off your Lenovo A6000 device and boot into Recovery mode. How to do this?
      • Make sure your device is totally turn off.
      • Now, press and hold Power Button + Volume Down + Volume UP button at the same time.
      • Then, release all button when you see Lenovo Logo appear on the screen.
      • Wait a minute, and you will enter Recovery Mode.
        recovery mode lenovo a6000
        recovery mode Lenovo a6000
    3. Use Volume Up and Volume Down to navigate all menu. and use the Power button to confirm your selection.
    4. Now select Wipe data/factory reset 
    5. Then select Yes- Delete all user data
    6. Then select apply update from sd card.
    7. Then navigate to the Stock Rom file that has been downloaded.
    8. Now, press power button to start downgrade process.
    9. Wait a while, once this downgrade finishes your Lenovo A6000 will reboot automatically.
    10. Finish.

    Saturday 18 June 2016

    [Guide] Flash Stock ROM | Firmware on Android Lenovo A3900 Using SP Flash Tool.

    [Guide] Flash Stock ROM | Firmware on Android Lenovo A3900 Using SP Flash Tool.

    Flash Stock Firmware Lenovo A3900. This guide will show you how to Flash Stock ROM or Firmware Android Lenovo A3900 Using SP Flash Tool. guidebelajar is not responsible for any phone damage which is incurred during Custom ROMs flashing process.

    Lenovo A3900 is device released in 2015, August. comes with 5,0 Inch IPS LCD capacitive touchscreen, 16M colors, Android OS, v4.4.2 (KitKat) and supported with MediaTek MT6752 chipset, Octa-core 1.2 GHz Cortex-A53 CPU, GPU  Mali-T760MP2, combined with 4 GB of RAM and 5 MP of Main camera and 2 MP on secondary camera.

    Prepare this before flash Lenovo A3900.

    1. Make sure you have backup all data and file stored on Internal memory Lenovo A3900
    2. Make sure you have at least 80% of battery capacity.
    3. Download USB VCOM Driver Here.
    4. Download SP Flash Tool 5.1532. Here or you can download the latest SP Flash tool from http://spflashtool.com/ 
    5. Downlo4d Lenovo A3900 Stock Firmware. You must be a registered user to downl04d this firmware. Here  
    6. Make sure you have enabled USB Debugging on your Android Lenovo A3900 device.
      • Go to Settings ->Developer Options -> USB Debugging.
      • If Developer Options does not appear under the settings menu. You can enable it by going to:
        • Settings > About Phone > Device Info and tap on Build Number for about 7-8 times. And then go back and follow the previous step.

    Guide to Install Stock ROM on Lenovo A3900.

    1. You must download SP Flash Tools and the custom ROM from the download link above.
    2. Read this guide for more instruction how to flash stock ROM using SP Flash Tool.

    [Guide] Hard Reset Android LENOVO ZUK Z1 To Remove Password, PIN, and Restore Factory Setting.

    [Guide] Hard Reset Android LENOVO ZUK Z1 To Remove Password, PIN, and Restore Factory Setting.

    Hard Reset LENOVO ZUK Z1. On this guide, guidebelajar will show you how Hard Reset Android LENOVO ZUK Z1 To Remove Password, PIN, and Restore Factory Setting. Perform a Hard reset on the android device will erase or deleted all data stored and App installed on internal phone memory, so you must backup all data before performing it.

    LENOVO ZUK Z1 is the smartphone released in September 2015. with 5,5 Inchi IPS LCD capacitive touchscreen, 16M colors, work on Android OS, v5.1.1 (Lollipop), planned upgrade to v6.0 (Marshmallow) and supported with chipset Qualcomm MSM8974AC Snapdragon 801, Processor Quad-core 2.5 GHz Krait 400, GPU Adreno 330, combined with 3 GB of RAM, 13 MP on primary camera and 8 MP on secondary camera.

    Hard reset process is called with master reset or factory reset, These are some of the reasons why we should perform a hard reset on our LENOVO ZUK Z1,

    • Because we want to remove all personal data and setting that was stored in LENOVO ZUK Z1.device.
    • Because we will sell our LENOVO ZUK Z1  Android phones.
    • Because we want to restore LENOVO ZUK Z1 to Default Factory Setting.
    • There are many bugs on LENOVO ZUK Z1.
    • We will give our LENOVO ZUK Z1 away to someone else, and we don't want that one know everything about our secret data, so we have to erase all data before back up it.
    • Our LENOVO ZUK Z1 has been lagging and stuck on android logo, this call with boot loop
    • We have forgotten on PIN or Pattern Lock at LENOVO ZUK Z1.
    • LENOVO ZUK Z1 has a persistent problem that cannot be solved
    • and many other reason.

    1st Methode. Hard Reset LENOVO ZUK Z1 Using Menu :

    1. Make sure your battery is fully charged, Recommended you have 80% of battery capacity
    2. Then Backup your LENOVO ZUK Z1. see this guide
    3. Go to menu: System Setting >
    4. Select Backup and Reset >
    5.  Factory Data Reset > 
    6. Reset Phone
    7. Choose Erase everything to confirm that you already to perform hard reset on  LENOVO ZUK Z1
    8. LENOVO ZUK Z1 will continue to hard reset process to restore factory default.

    2ndMethode. Hard Reset LENOVO ZUK Z1 Using Hardware Keys:

    1. Make sure your battery is fully charged, we recommended that your battery has 80% power
    2. Always BackUp your important data that store in LENOVO ZUK Z1. see this guide
    3. Turn Off your LENOVO ZUK Z1 by hold and press Power Button for a second.
    4. Release any SIM card and SD card that was installed on your LENOVO ZUK Z1 smartphone.
    5. Then press and hold a combinatin key Power button + Volume Down.
    6. Hard Reset Android LENOVO ZUK Z1
      Hard Reset Android LENOVO ZUK Z1
    7. Release only Power Button while Keep holding volume down button when you see Zuk Logo appear on the screen.
    8. Then release all button when your LENOVO ZUK Z1 vibrate and enter recovery mode.

    9. recovery mode lenovo ZUK Z1
      recovery mode Lenovo ZUK Z1

    10. Then Select Erase User data.
    11. To navigate the menu on this screen you can use volume down, then use the power button to execute your selection.
    12. Then follow all instruction show on screen.
    13. Once finished, you can wait a while for LENOVO ZUK Z1  to reboot the system
    14. Done, your hard reset process success now.

    Thursday 16 June 2016

    Hard Reset Android LENOVO X3 To Remove PIN, Password and Restore Factory Setting [Guide].

    Hard Reset Android LENOVO X3 To Remove PIN, Password and Restore Factory Setting [Guide].

    Hard Reset LENOVO X3. This device Is Also known as Lenovo Vibe P1 Pro, And now guidebelajar will show you how to perform a hard reset on LENOVO X3 smartphone. Perform a Hard reset on the Android device will erase or deleted all data stored and App installed on internal phone memory, so you must backup all data before performing it.

    LENOVO X3 is the smartphone released in December 2015. with 5,5 Inch IPS LCD capacitive touchscreen, 16M colors, work on Android OS, v5.1 (Lollipop) and supported with chipset Qualcomm MSM8992 Snapdragon 808, Processor Quad-core 1.2 GHz Cortex-A53 & Dual-core 1.8 GHz Cortex-A57, GPU Adreno 418, combined with 3 GB of RAM, 21 MP on primary camera and 8 MP on secondary camera.

    Some People say that Hard reset process is called with master reset or factory reset. Many people asking why should we perform a hard reset on our phone. The logical answer that can we say for this asking is :
    • There are many bugs on LENOVO X3.
    • Because we will sell our LENOVO X3  Android phones.
    • Because we want to restore LENOVO X3 to Default Factory Setting.
    • Because we We want to remove all personal data and setting that was stored in LENOVO X3.device.
    • We will give our LENOVO X3 away to someone else, and we don't want that one know everything about our secret data, so we have to erase all data before back up it.
    • Our LENOVO X3 has been lagging and stuck on android logo, this call with boot loop
    • We have forgotten on PIN or Pattern Lock at LENOVO X3.
    • LENOVO X3 has a persistent problem that cannot be solved
    • and many other reason.

    1st Methode. Hard Reset LENOVO X3 Using Menu :

    1. Make sure your battery is fully charged, Recommended you have 80% of battery capacity
    2. Then Backup your LENOVO X3. see this guide
    3. Go to menu: System Setting >
    4. Select Backup and Reset > 
    5. Factory Data Reset > 
    6. Reset Phone
    7. Choose Erase everything to confirm that you already to perform hard reset on  LENOVO X3
    8. LENOVO X3 will continue to hard reset process to restore factory default.

    2ndMethode. Hard Reset LENOVO X3 Using Hardware Keys:

    1. Make sure your battery is fully charged, we recommend that your battery has 80% power
    2. Always BackUp your important data that store in LENOVO X3. see this guide
    3. Turn Off your LENOVO X3 by hold and press Power Button for a second.
    4. Release any SIM card and SD card that was installed on your LENOVO X3 smartphone.
    5. Then press and hold a combination key Power button +Volume Down.
    6. Release power button only when you see Lenovo Logo appear on the screen.
    7. lenovo Logo
      lenovo Logo
    8. Then release all button when your LENOVO X3 vibrate and enter recovery mode.
    9. Then Select Factory Reset.
    10. To navigate the menu on this screen you can use volume up and volume down, then use the power button to execute your selection.
    11. Then follow all instruction show on screen.
    12. Once finished, you can wait a while for LENOVO X3  to reboot the system
    13. Done, your hard reset process success now.

    Wednesday 15 June 2016

    How to Hard Reset / Factory Reset MICROSOFT LUMIA 435 [Guide].

    How to Hard Reset / Factory Reset MICROSOFT LUMIA 435 [Guide].

    Hard Reset MICROSOFT LUMIA 435. MICROSOFT LUMIA 435 is the smartphone released on March 2015. with 4,0 Inch Capacitive touchscreen, 16M colors, work on  Microsoft Windows Phone 8.1, planned upgrade to Windows 10, and supported with Dual-core 1.2 GHz Cortex-A7 CPU, Qualcomm MSM8210 Snapdragon 200 chipset, Adreno 302 GPU, combined with 1 GB of RAM, 2 MP on primary camera and VGA on secondary camera.

    Performing a factory data reset on  MICROSOFT LUMIA 435 will erase/wipe or delete all data stored and App installed from the device, it's recommended that you backup all data before perform hard reset or factory reset. Your contact and email information will be saved on Google server if you enabled Google account on your  MICROSOFT LUMIA 435.

    A hard reset, also known as a factory reset or master reset, And below are some reason why we need to perform hard reset or factory reset on our  MICROSOFT LUMIA 435.
    • Restore MICROSOFT LUMIA 435 to Default Factory Setting.
    • There are many bugs on MICROSOFT LUMIA 435.
    • MICROSOFT LUMIA 435  has a persistent problem that cannot be solved.
    • We want to remove all personal data and setting that was stored in MICROSOFT LUMIA 435 device.
    • Because we will sell our MICROSOFT LUMIA 435   phones.
    • We have forgotten on PIN or Pattern Lock at MICROSOFT LUMIA 435.
    • We will give our MICROSOFT LUMIA 435  away to someone else, and we don't want that one know everything about our secret data, so we have to erase all data before back up it.
    • Our MICROSOFT LUMIA 435  has been lagging and stuck on logo, this call with boot loop.
    • and much other reasons.

    1st Method. Hard Reset MICROSOFT LUMIA 435  Using Software Menu :

    1. Make sure your battery is fully charged, Recommended you have 80% of battery capacity
    2. Then Backup your MICROSOFT LUMIA 435. see this guide
    3. Open the application tray, 
    4. Go to menu: Windows Phone Setting >
    5. Select About>
    6. Reset Your Phone > 
    7. MICROSOFT LUMIA 650  will continue to hard reset process to restore factory default.

    2nd Method. Hard Reset MICROSOFT LUMIA 435  Using Hardware Keys:

    1. Make sure your battery is fully charged, we recommended that your battery has 80% power
    2. Always Back Up your important data that store in MICROSOFT LUMIA 435. see this guide
    3. Turn Off your MICROSOFT LUMIA 435  by hold and press Power Button for a second.
    4. Release any SIM card and SD card that was installed on your MICROSOFT LUMIA 435  smartphone.
    5. Now press the Power button until the MICROSOFT LUMIA 435 device vibrates and release it, then quickly Press and hold the Volume Down Button.
    6. Then release all button when you see exclamation sign on screen.
    7. Now press the button in this order ; 
      • Volume UP Button.
      • Volume Down Button.
      • Power Button.
      • Volume Down Button. (long press on this button)
    8. And you will see a Microsoft Logo appear on the screen.
    9. Now, wait until the hard reset or factory reset ends, and the MICROSOFT LUMIA 435 will reboot. it will take a while.
    10. Then your MICROSOFT LUMIA 435 will boot up automatically.
    11. Now you must set up your device for the first time.
    12. Finish.

    How to Hard Reset / Factory Reset MICROSOFT LUMIA 532 [Guide].

    How to Hard Reset / Factory Reset MICROSOFT LUMIA 532 [Guide].

    Hard Reset MICROSOFT LUMIA 532. MICROSOFT LUMIA 532 is the smartphone released on February 2015. with 4.0 Inchi ACapacitive touchscreen, 16M colors, work on Microsoft Windows Phone 8.1, and supported with Quad-core 1.2 GHz Cortex-A7 CPU, Qualcomm MSM8212 Snapdragon 200 chipset, Adreno 302 GPU, combined with 1 GB of RAM, 5 MP on primary camera and VGA on secondary camera.

    Performing a factory data reset on MICROSOFT LUMIA 532 will erase / wipe or delete all data stored and App installed from the device, it's recommended that you backup all data before perform hard reset or factory reset. 

    A hard reset, also known as a factory reset or master reset, And below are some reason why we need perform hard reset or factory reset on our  MICROSOFT LUMIA 532.
    • We want to remove all personal data and setting that was stored in MICROSOFT LUMIA 532 device.
    • MICROSOFT LUMIA 532  has a persistent problem that cannot be solved.
    • Restore MICROSOFT LUMIA 532 to Default Factory Setting.
    • There are many bug on MICROSOFT LUMIA 532.
    • Because we will sell our MICROSOFT LUMIA 532   phones.
    • We have forgotten on PIN or Patern Lock at MICROSOFT LUMIA 532.
    • We will give our MICROSOFT LUMIA 532  away to some one else, and we don't want that one know everything about our secret data, so we have to erase all data before back up it.
    • Our MICROSOFT LUMIA 532  has been lagging and stuck on logo, this call with bootloop.
    • and many other reasons.

    1st Method. Hard Reset MICROSOFT LUMIA 532  Using Software Menu :

    1. Make sure your batery is fully charged, Recomended you have 80% of battery capacity
    2. Then Backup your MICROSOFT LUMIA 532. see this guide
    3. Open the application tray, 
    4. Go to menu: Windows Phone Setting >
    5. Select About>
    6. Reset Your Phone > 
    7. MICROSOFT LUMIA 650  will continue to hard reset process to restore factory default.

    2nd Method. Hard Reset MICROSOFT LUMIA 532  Using Hardware Keys:

    1. Make sure your battery is fully charged, we recommended that your battery has 80% power
    2. Always Back Up your important data that store in MICROSOFT LUMIA 532. see this guide
    3. Turn Off your MICROSOFT LUMIA 532  by hold and press Power Button for a second.
    4. Release any SIM card and SD card that was installed on your MICROSOFT LUMIA 532  smartphone.
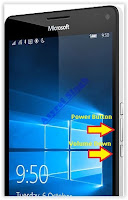
    5. Now press and hold Power button and Volume Down Button until MICROSOFT LUMIA 532 device vibrates and release Power Button only, and you will see Microsoft logo on screen.
    6. hard reset microsoft lumia 532
      hard reset microsoft lumia 532
    7. Then release all button when you see exclamation sign on screen.
    8. Now press the button in this order ;
      • Volume UP Button.
      • Volume Down Button.
      • Power Button.
      • Volume Down Button. (long press on this button)
    9. And you will see a Microsoft Logo appear on screen.
    10. Now, wait until the hard reset or factory reset ends, and the MICROSOFT LUMIA 532 will reboot. it will take a while.
    11. Then your MICROSOFT LUMIA 532 will boot up automatically.
    12. Now you must set up your device for the first time.
    13. Finish.

    [Guide] How to Hard Reset / Factory Reset MICROSOFT LUMIA 650.

    [Guide] How to Hard Reset / Factory Reset MICROSOFT LUMIA 650.

    Hard Reset MICROSOFT LUMIA 650. MICROSOFT LUMIA 650 is the smartphone released in February 2016. with 5,0 Inchi OLED capacitive touchscreen, 16M colors, work on Microsoft Windows 10 OS, and supported with Quad-core 1.3 GHz Cortex-A7 CPU, Qualcomm Snapdragon 212 chipset, Adreno 304 GPU, combined with 1 GB of RAM, 8 MP on primary camera and 5 MP on secondary camera.

    Performing a factory data reset on MICROSOFT LUMIA 650 will erase/wipe or delete all data stored and App installed from the device, it's recommended that you backup all data before perform hard reset or factory reset. 

    A hard reset, also known as a factory reset or master reset, And below are some reason why we need to perform hard reset or factory reset on our  MICROSOFT LUMIA 650.
    • Because we will sell our MICROSOFT LUMIA 650  phones.
    • MICROSOFT LUMIA 650  has a persistent problem that cannot be solved.
    • Our MICROSOFT LUMIA 650  has been lagging and stuck on logo, this call with boot loop.
    • Restore MICROSOFT LUMIA 650 to Default Factory Setting.
    • There are many bugs on MICROSOFT LUMIA 650.
    • We want to remove all personal data and setting that was stored in MICROSOFT LUMIA 650 device.
    • We have forgotten on PIN or Pattern Lock at MICROSOFT LUMIA 650.
    • We will give our MICROSOFT LUMIA 650  away to someone else, and we don't want that one know everything about our secret data, so we have to erase all data before back up it.
    • and much other reasons.

    1st Method. Hard Reset MICROSOFT LUMIA 650  Using Software Menu :

    1. Make sure your battery is fully charged, Recommended you have 80% of battery capacity
    2. Then Backup your MICROSOFT LUMIA 650. see this guide
    3. Open the application tray, 
    4. Go to menu: Windows Phone Setting >
    5. Select About>
    6. Reset Your Phone > 
    7. MICROSOFT LUMIA 650  will continue to hard reset process to restore factory default.

    2nd Method. Hard Reset MICROSOFT LUMIA 650  Using Hardware Keys:

    1. Make sure your battery is fully charged, we recommended that your battery has 80% power
    2. Always Back Up your important data that store in MICROSOFT LUMIA 650. see this guide
    3. Turn Off your MICROSOFT LUMIA 650  by hold and press Power Button for a second.
    4. Release any SIM card and SD card that was installed on your MICROSOFT LUMIA 650  smartphone.
    5. Now, press and hold Volume Down Button, while connecting the MICROSOFT LUMIA 650 device to the computer via USB cable.
    6. Hard Reset / Factory Reset MICROSOFT LUMIA 650.
      Hard Reset / Factory Reset MICROSOFT LUMIA 650.
    7. Release Volume Down when you see Microsoft logo on the screen. Then you will see an exclamation sign on screen.
    8. Now press the button in this order ;
      • Volume UP Button.
      • Volume Down Button.
      • Power Button.
      • Volume Down Button. (long press on this button)
    9. And you will see a Microsoft Logo appear on the screen.
    10. Now, wait until the hard reset or factory reset ends, and the MICROSOFT LUMIA 650 will reboot. it will take a while.
      hard reset process - microsoft lumia 650
      hard reset process - Microsoft Lumia 650
    11. Then your MICROSOFT LUMIA 650 will boot up automatically.
    12. Now you must set up your device for the first time.
    13. Finish.

    Tuesday 14 June 2016

    [Guide] How to Install TWRP Recovery and Root Android Lenovo Vibe K5 | K5 Plus

    [Guide] How to Install TWRP Recovery and Root Android Lenovo Vibe K5 | K5 Plus.

    Install TWRP Recovery and Root Vibe Lenovo K5. This guide will show you how to  Install TWRP Recovery and Root Android Lenovo Vibe K5 | K5 Plus. If you want to root the Lenovo Vibe K5 or K5 plus you must install TWRP Recovery first on this device. We know that TWRP is a custom recovery image for Android-based devices, and this recovery provided GUI interface or with touchscreen enabled, by using TWRP we allow users to install third-party firmware and backup the current system. therefore, TWRP often installed when rooting Android smartphone devices.

    Lenovo Vibe K5  is the smartphone released in February 2016. with 5,0 Inch IPS capacitive touchscreen, 16M colors, work on Android OS, v5.1 (Lollipop), and supported with Quad-core 1.5 GHz Cortex-A53 & Quad-core 1.2 GHz Cortex-A53 CPU, Qualcomm MSM8929 Snapdragon 415 chipset, Adreno 405 GPU, combined with 2 GB of RAM, 13 MP on primary camera and 5 MP on secondary camera.

    Install TWRP on Lenovo Vibe K5.

    Here is the guide started. Now follow all step carefully.
    1. Make sure Minimal ADB and fastboot installed on your computer. you can see this guide.
    2. Make sure your battery is not empty or at least has 70% of battery capacity.
    3. Now, switch on your Lenovo Vibe K5.
    4. Then enable the Developer Options.
      • Go to Setting -> About Phone -> Phone Information -> tap 7 times at Build Number,
    5. Then, Enable USB Debugging
      • Go to Settings -> Developer -> USB Debugging
    6. Now, Enable OEM unlock.
      • Go to Settings -> Developer -> Unlock OEM
    7. Make sure driver for Lenovo Vibe K5 installed correctly on your computer, you can find the driver that comes on the CD cell partition
    8. Now, connect your Lenovo Vibe K5 to the computer using the original USB cable.
    9. Then, D0wnload the TWRP recovery, and copy it to the folder where ADB is installed on your computer.
    10. https://drive.google.com/file/d/0B2I5z1mFfUpcM0lHaHRsRTlsalk/view?usp=sharing
      • Alternative Link
      • http://forum.xda-developers.com/devdb/project/?id=15529#downloads
      • Created by Shreps 
      • http://forum.xda-developers.com/member.php?u=4493088
      • TWRP version : 3.0.2.0
      • Filename : twrp-k5-3.0.2-r1_shreps.img
    11. Open a command prompt from within your fastboot folder.
    12. To start this command prompt just hold shift + right click, select open command prompt here.
      Run ADB on computer
      Run ADB on computer
    13. Now type,
      • adb devices
    14. This command used to confirm the connection between Lenovo Vibe K5 and the computer.
    15. Once the connection confirmed. Now type.
      • adb reboot bootloader
    16. If you want to temporarily boot this recovery type,
      • fastboot boot TWRP-k5-3.0.2-r1_shreps.img
    17. If you want to permanently flash it, type;
      • fastboot flash recovery TWRP-k5-3.0.2-r1_shreps.img
    18. Finish.

    Root on Lenovo Vibe K5.

    1. This step will show you how to root Lenovo Vibe K5
    2. To start it, you must Download the ZIP file SuperSU v2.46 
    3. https://download.chainfire.eu/696/supersu/
    4. Then save it to the micro SD card.
    5. Now turn off your Lenovo Vibe K5.
    6. Then enter into recovery mode.
      • Press and hold Power Button and Volume Up button
    7. Then follow instruction appear on the screen. 
    8. Select recovery to install SuperSu from SD Card.

    Thursday 9 June 2016

    Guide How to Download Microsoft | Nokia Lumia Firmware.

    Guide How to Download Microsoft | Nokia Lumia Firmware.

    Download Microsoft | Nokia Lumia Firmware. This guide will show you how to Download Microsoft or Nokia Lumia Firmware. You can use this firmware to upgrade or downgrade your Android devices, evenly you can fix any error or problem like a boot loop or stuck on any Microsoft or Nokia Lumia devices. And now you can download the firmware by yourself. Then you can follow my simple guide below.

    Download Microsoft | Nokia Lumia Firmware.

    1. Make sure you have an internet connection on your computer or laptop.
    2. You can use any browser to download the firmware.
    3. Now, Go to this website (www.lumiafirmware.com)
    4. http://www.lumiafirmware.com/
    5. This is the lumiafirmware.com page.
      Download Microsoft | Nokia Lumia Firmware.
      Download Microsoft | Nokia Lumia Firmware.
    6. From the left column, choose the Microsoft Lumia device or the Nokia Lumia device. For an example is Microsoft Lumia 550.
      Download Microsoft | Nokia Lumia Firmware.
      Download Microsoft | Nokia Lumia Firmware.
    7. Then, From the middle column, you can choose an available package. 
      • Choose the package that depending on your Microsoft Lumia product type (RM-x, where x is variable), 
      • Select your country of residence and Country Variant (CV)
      • You can find product type at the original packing box of Lumia device, in general from a white label.
      Download Microsoft | Nokia Lumia Firmware.
      Download Microsoft | Nokia Lumia Firmware.
    8. Now, see at the right column, to select on a release version. In this column you can see; 
      • Available list of firmware.
      • Phone model: Lumia 550
      • PackageTitle: RM-1127 VAR EURO PL PLAY 
      • Product Code: 059X4Z1 
      • manufacturerHardwareModel: RM-1127 
      • Last Firmware: 01078.00037.16082.41010 
      • OperatorName: PLA-PL,
        Download Microsoft | Nokia Lumia Firmware.
        Download Microsoft | Nokia Lumia Firmware
    9. If you click on the list of firmware, now you will see a new column at the top of the window, then you can download all available files.
      Download Microsoft | Nokia Lumia Firmware
      Download Microsoft | Nokia Lumia Firmware
    10. Then, create a new folder named Package from the Windows desktop.
    11. Now, Copy and Paste all downloaded files to the Package folder.
    12. Finish.

    Wednesday 8 June 2016

    [Guide] How to Flash Microsoft Lumia Devices To Upgrade or Fix Bootloop.

    [Guide] How to Flash Microsoft Lumia Devices To Upgrade or Fix Bootloop.

    Flash Microsoft Lumia Devices. This guide will show you How to Flash Microsoft Lumia Devices To Upgrade or Fix Bootloop. You can follow this guide by reading all instructions carefully, and we can not be responsible if a software damage occurs from the Microsoft Lumia device or the Nokia Lumia device by the utilization of my guide. Thanks for DilanChd  
    https://goo.gl/wv3bTD
     from xda for this useful tutorial.


    What you need to start this guide?

    1. A computer or laptop runs on Microsoft Windows Operating System. You can run Windows 7 / Windows 8 / Windows 8.1 / Windows 10.
    2. Original USB cable to connect your Microsoft Lumia device to the computer or laptop.
    3. Always backup all data and file stored on your Microsoft Lumia device (recommended).
    4. A  Microsoft Lumia device incorporating Microsoft Windows Phone 8, Microsoft Windows Phone 8.1 or Microsoft Windows 10 Mobile as the operating system.
    5. At least 10 GB free space on computer disk.
    6. D0wnload Windows device recovery tool software, this tool is called WindowsDeviceRecoveryTool3.3.31.exe.  here 
    7. https://goo.gl/r8gLL5

    How to install Windows Device Recovery Tool.

    1. Once WindowsDeviceRecoveryTool3.3.31.exe successfully downloaded, now you can execute this file,
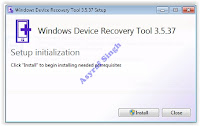
    2. Then you will see a new window appear on your screen.
    3. Now, From this window, click on the Install button.
      installing device recovery tool - flash lumia
      installing device recovery tool - flash Lumia
    4. Then you will see User Account Control windows appears on the computer screen. you can click Yes, and this window will close
      installing device recovery tool - flash lumia
      installing device recovery tool - flash Lumia
    5.  Then the process will return to the installation of Windows Device Recovery Tool.
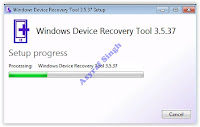
    6. Just wait for a second for this installation process until finish. This process will download all necessary program for your 
      installing device recovery tool - flash lumia
      installing device recovery tool - flash Lumia
    7. Then click Next.
    8. Thick on I accept the terms in License Agreement and click Next.
    9. Then click Install
    10. If you've finished the installation process, you should see this windows appear.
      installing device recovery tool - flash lumia
      installing device recovery tool - flash Lumia
    11. Once this step is finished, now you can go to the next step.

    Download 64 Bit Checker & Determine the OS Architecture.

    1. You can download 64Bit Checker Here.
    2. http://www.igorware.com/64bit-checker/download
    3. This tool used to check which OS architecture used by your computer or laptop
    4. Now, Execute the 64bitChecker1.5.0.exe file.
    5. Now, you will see the 64bit checker window appear on the screen.
      64 bit checker
      64-bit checker
    6. From this window, we know what is the OS architecture we use. and this information will be useful later for the Installation package part.

    Download Lumia Firmware.

    1. To download Microsoft Lumia Firmware you can go to this website. Here 
    2. https://goo.gl/G5Mbur
    3. For further instruction on how to download Lumia Firmware, you can visit this link.
    4. https://goo.gl/Q1FRXA

    How To Install Package ?.

    1. To install the package on Microsoft Lumia, you must connect your Microsoft Lumia device to the computer.
    2. Then open a command prompt in administrator mode.
    3. Now, copy and paste this command below.
      • For 32Bit Windows OS Architecture.
        • cd "%ProgramFiles%\Microsoft Care Suite\Windows Device Recovery Tool"
      • For 64Bit Windows OS Architecture.
        • cd "%ProgramFiles(x86)%\Microsoft Care Suite\Windows Device Recovery Tool"
    4. Then, Copy and modify the 
      • thor2 -mode vpl -vplfile "%HomePath%\Desktop\Package\x.vpl" command, where x is the name of the VPL file previously downloaded.
    5. Once the modify is done, now copy and paste your modify command to the command prompt.
    6. Then press the Enter button on a computer keyboard.
    7. Now, the installation package is started, just wait until finished.
    8. Then, Copy and paste the thor2 -mode rnd -bootnormalmode command to the command prompt to reboot your Microsoft Lumia device normally.
    9. Done, 

    Tuesday 7 June 2016

    How to Hard Reset / Factory Reset MICROSOFT LUMIA 950 XL [Guide].

    How to Hard Reset / Factory Reset MICROSOFT LUMIA 950 XL [Guide].

    Hard Reset MICROSOFT LUMIA 950 XL. MICROSOFT LUMIA 950 XL is the smartphone released in November 2015. with 5,7 Inchi AMOLED capacitive touchscreen, 16M colors, work on Microsoft Windows 10 OS, and supported with Quad-core 1.5 GHz Cortex-A53 & Quad-core 2.0 GHz Cortex-A57 CPU, Qualcomm MSM8994 Snapdragon 810 chipset, Adreno 430 GPU, combined with 1 GB of RAM, 8 MP on primary camera and 2 MP on secondary camera.

    Performing a factory data reset on MICROSOFT LUMIA 950 XL will erase/wipe or delete all data stored and App installed from the device, it's recommended that you backup all data before perform hard reset or factory reset. 

    A hard reset, also known as a factory reset or master reset, And below are some reason why we need to perform hard reset or factory reset on our  MICROSOFT LUMIA 950 XL.
    • We want to remove all personal data and setting that was stored in MICROSOFT LUMIA 950 XL device.
    • MICROSOFT LUMIA 950 XL  has a persistent problem that cannot be solved.
    • Restore MICROSOFT LUMIA 950 XL to Default Factory Setting.
    • There are many bugs on MICROSOFT LUMIA 950 XL.
    • Because we will sell our MICROSOFT LUMIA 950 XL   phones.
    • We have forgotten on PIN or Pattern Lock at MICROSOFT LUMIA 950 XL.
    • We will give our MICROSOFT LUMIA 950 XL  away to someone else, and we don't want that one know everything about our secret data, so we have to erase all data before back up it.
    • Our MICROSOFT LUMIA 950 XL  has been lagging and stuck on logo, this call with boot loop.
    • and much other reason.

    1st Method. Hard Reset MICROSOFT LUMIA 950 XL  Using Software Menu :

    1. Make sure your battery is fully charged, Recommended you have 80% of battery capacity
    2. Then Backup your MICROSOFT LUMIA 950 XL . see this guide
    3. Open the application tray, 
    4. Go to menu: Windows Phone Setting >
    5. Select About>
    6. Reset Your Phone > 
    7. MICROSOFT LUMIA 650  will continue to hard reset process to restore factory default.

    2nd Method. Hard Reset MICROSOFT LUMIA 950 XL  Using Hardware Keys:

    1. Make sure your battery is fully charged, we recommended that your battery has 80% power
    2. Always Back Up your important data that store in MICROSOFT LUMIA 950 XL. see this guide
    3. Turn Off your MICROSOFT LUMIA 950 XL  by hold and press Power Button for a second.
    4. Release any SIM card and SD card that was installed on your MICROSOFT LUMIA 950 XL  smartphone.
    5. Now press and hold the Power button and Volume Down Button until MICROSOFT LUMIA 950 XL device vibrates and release Power Button only, and you will see the Microsoft logo on the screen.
    6. Reset / Factory Reset MICROSOFT LUMIA 950 XL
      Reset / Factory Reset MICROSOFT LUMIA 950 XL
    7. Then release all button when you see exclamation sign on screen.
    8. Now press the button in this order ;
      • Volume UP Button.
      • Volume Down Button.
      • Power Button.
      • Volume Down Button. (long press on this button)
    9. And you will see a Microsoft Logo appear on the screen.
    10. Now, wait until the hard reset or factory reset ends, and the MICROSOFT LUMIA 950 XL will reboot. it will take a while.
    11. Then your MICROSOFT LUMIA 950 XL will boot up automatically.
    12. Now you must set up your device for the first time.
    13. Finish.